Saturday, August 22, 2020

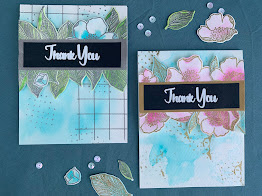
Feminine and masculine card sets. Altenew Challenge Level 1.

Today I have a very special post, I completed my 10 AECP classes, and now I got a great challenge as a final test to approve level 1. It has been an awesome experience, allowing myself to create is a total gift.

Let´s get to it because I have loads to share. I made a video with all the process, including my creative process, the actual creation of the sets and the packaging.


The challenge consists in creating 2 card sets, a feminine set and a masculine set, with a cohesive theme. I needed to choose 3 elements from the classes taken during this level 1. It was a hard decision as I have many favourites… But I went with these three:

*Let it shine. It provides wonderful ideas to give that extra special touch to any card, adding shiny elements that take the projects to a higher level.

*Easy die cutting techniques. This class gave me a whole new way of taking advantage of my dies, and it´s very important when mass producing as it really speeds up the process, and also make the cards look more professional.

*Irresistible inking techniques. I enjoyed so much the different ways of incorporating inks other than stamping with it, it gives a lot of more potential to all those gorgeous ink colours. 


Creative Process

My mother, who is a PhD in Education, asked me about my creative process when I told her about the challenge. She was very curious to see and compare her creative process as an academic professional with a more relaxed and artistic process, so I thought it could be interesting for some of you to see how I did it.

-Before knowing all the details about the challenge:

·      I chose my favourite cards from the 10 classes during level 1.

·      I lay them on the table and stated (in my head) why I liked them, for example: the colour combination, the layout, the technique, etc. 

-After getting all the details of the challenge:

·      I wrote down all the requirements, I did it by hand as it helps me understand the idea better.

·      Then I made a list of common elements I wanted my cards to have, based on what I liked the most of my previous cards. I also considered that I needed to make many cards, they had to be special but not too time-consuming.

·      Then I made a little table where I put elements that were different to the sets, so I had the feminine on one side and the masculine on the other, so I could visualize the differences between the sets. 

·      Then I decided to make 6 cards per set. It sounds like a good number for a card set.

·      I created a little sketch for each card, I made 6 models, so I would make 2 cards of each design, one for the feminine set and another for the masculine one.

·      I had all this info in one piece of paper, and I used it all along, some ideas I used exactly as I wrote them and some I had to be a bit flexible and change.

·      This way of working kept me on track at all times, I had my guide to refer to at any point.


     Since making 12 cards counts as mass producing I created all elements for all cards step by step: first I made all the backgrounds, then stamped and heat embossed flowers, leaves and sentiments, then painted flowers and leaves, then assembled the cards 2 by 2, using my guide for the designs. This saves a lot of time and makes the elements more cohesive.


Creating the cards

Backgrounds

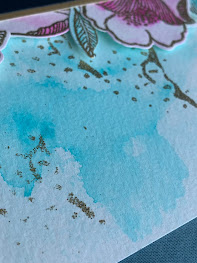
I created all the backgrounds at once. I cut around 16 pieces of watercolour paper, a bit bigger than A2 size. I sprayed both sides of the paper with water and inked a sleek surface with blue ink, then I picked some colour with a bush and started adding it to the panels.

I changed a bit the way I added the ink, sometimes using an acetate to smoosh the ink, sometimes more ink or more water. I just wanted to create different backgrounds with the same colours.

I let them air dry and placed them under a stack of books overnight to flatten them bit.

I wanted to add a shiny element to the backgrounds, so I heat embossed a few dots here and there, making it a bit distressed. I didn’t use a powder tool as I didn´t mind the embossing power sticking everywhere.

Later I decided to add some geometric element to the masculine set, so I stamped some lines with grey ink, I stamped them horizontally and vertically to create squares in the backgrounds.

Elements

Using my guide, I guessed how many flowers and leaves I would need, just to have an idea. 

I chose the set “Adore You” for my images, I love this set and I also have the dies which makes everything easier. 

Since I needed many flowers and leaves, I decided to leave the stamps in their original place, I took out all the sentiments. I prepared the surface with and antistatic power bag, inked the stamps with embossing ink and left them flat on the table, then I brought the paper on top of the stamps, rubbed it really well with my fingers but making sure it didn´t shift and lifted it carefully. Then sprinkled some embossing power and heat set it.

I repeated the process a couple of times and then changed colours to make enough elements for both sets. I also made a few more with only leaves for the masculine set.

For the sentiments I used “Painted Butterflies” and “Adore you” stamp sets. I used a stamp positioner this time, I like to stamp it 2 or 3 times to make sure all letters are properly stamped, without squashing them. 

I lined all the sentiments so I would get many at once. 

I used black cardstock and white embossing powder, always preparing the surface with the antistatic bag, and cleaning up the area with a dry brush to make sure there is no stray powder.


Painting flowers and leaves

I used a similar technique to paint the flowers and leaves as I did for the backgrounds. I wanted a distressed-watercolour look. So I wet the elements using a clean brush, then added a light colour to the whole image going outside of the line, then I picked a darker shade of the same colour and added a few touches here and there and let the ink flow on its own, this technique allowed me to paint everything really fast and I love the organic look it gives. I let everything airdry.

Cutting

I die cut all the flowers and leaves using my die cutting machine and I placed them in mugs, one for the feminine and another for the masculine to keep them organized.

I also cut the sentiment strips and trimmed the backgrounds to an A2 size.


Assembling

After creating my card bases, I distributed the elements and sentiments among the 12 cards, to make sure I had enough of the elements and balanced among the 6 models. 

I worked on pairs of cards following my sketches. So, I had models 1 to 6, depending on the design I wanted a darker or lighter background, I wrote the number of the model behind each background to identify them. There are 3 background that needed some die cutting.

This is the general process for each pair of cards.

·      Place elements according the model I was working on, move things around and arrange them in a way I like them. Do it for the feminine one and the masculine one.

·      Add dimension to elements using fun foam, I use all my scraps.

·      Glue all elements. Including the sentiment.

·      Work on the next pair. 

·      When they were ready, I added a couple of sequins to some of the feminine cards.

Model 1


Model 2 

Model 3

Model 4

Model 5

Model 6

Feminine card set

Masculine card set

Packaging

I used recycled elements to make my boxes. For the cardboard part I used the backing of cardstock packaging, the ones that come in a spiral book. And for the plastic cover I used a box of some make up brushes (for crafting of course!).

I drew a sketch for the bottom part of the box, a rectangle with flaps, cut it out and glue the corners. For the top, the piece was the perfect size, cutting it in half gave me the right size for each box. I decorated this plastic clear cover with some leftovers from the backgrounds. And to attach the top and bottom of the boxes I used a string, so I wouldn’t have to deal with gluing plastic to the cardboard, and it gives a nice touch.

I left the cardboard its natural colour, I think it goes well with the cards.


I hope you like them and that I gave you some ideas, or at least I make you wanna go create something. Have a wonderful day!

Espero que te hayan gustado y que te haya dado algunas ideas, o al menos te haga querer ir a crear algo. ¡Qué tengas día genial!




Sunday, July 5, 2020

For the guys Card


Hello everybody!

My card for today is the last one for level 1 of my Altenew certification!!! After this I will have a special challenge to complete this level, I´m so looking forward to working on the challenge project, which I still don´t know what it is. As I have said before, I´m taking their full program and I’m very excited how it has encouraged me to create and enjoy my crafting time.

¡Hola todos!

¡Mi tarjeta de hoy es la última de las 10 clases del nivel 1 de mi certificación con Altenew! Después de esto, tendré un desafío especial para completar el nivel, tengo muchas ganas de trabajar en el proyecto, que todavía no sé de qué se trata. Como he dicho antes, estoy tomando su programa completo y estoy muy emocionada de cómo me ha animado a crear y disfrutar mi tiempo de elaboración.


The quarantine has allowed me to create more, as traveling times are non-existent, being home the whole day asks for a variety of activities, we managed to work from home, do virtual school, exercise, watch TV, craft, cook…it´s been very interesting how we’ve managed our time. On the other hand, I´ve been stuck with the materials I have to create my cards, I haven´t been able to order anything and my local scrapbooking store went out of business after this tough times 

La cuarentena me ha permitido crear más, no tengo que movilizarme a ningún sitio, estar en casa todo el día requiere una variedad de actividades, nos las arreglamos para trabajar desde casa, hacer colegio virtual, hacer ejercicio, mirar televisión, hacer manualidades, cocinar ... Ha sido muy interesante cómo hemos manejado nuestro tiempo. Por otro lado, me quedé corta con los materiales que tengo para crear mis tarjetas, no he podido pedir nada y la tienda de scrapbooking local tuvo que cerrar después de estos tiempos difíciles 


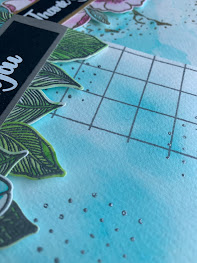
“For the guys” class is led by Jennifer Rzasa and what an amazing job she does, with very simple ideas she makes perfect cards for any man. I really enjoyed she approach in this class. I was drawn to her ideas on using geometric stamps, but I don´t have any and wasn’t able to order them. So, I decided to make the shapes by masking the areas to build a geometric pattern using some Altenew Inks, so a bit of ink blending, moving masks (I used post-its), more ink blending. It was fun!

La clase "For the Guys" es impartida por Jennifer Rzasa y me encantó el trabajo tan increíble que hace, con ideas muy simples, hace tarjetas perfectas para cualquier hombre. Realmente disfruté su enfoque en esta clase. Me atrajeron sus ideas sobre el uso de sellos geométricos, pero no tengo ninguno y no pude ordenarlos. Entonces, decidí hacer las formas enmascarando las áreas para hacer un patrón geométrico usando algunas tintas Altenew, mezclando tinta, utilicé “post-its” como máscaras. ¡Fue muy divertido!


I chose a blue, green and grey palette for my card. I cut the geometrical panel in two pieces to create two borders. I wanted to add some leaves to the card to break the geometric, straight lines that I had going on. So, I stamped them with black ink directly on my grey card base. I used the “Adore You” stamp set for the leaves and also the sentiment.

La paleta de colores para mi tarjeta es azul, verde y gris. Corté el panel geométrico en dos piezas para crear dos bordes. Quería agregar algunas hojas a la tarjeta para romper las líneas geométricas y rectas que tenía. Entonces, los sellé con tinta negra directamente en la base de mi tarjeta gris. Usé el set de sellos "Adore You" para las hojas y también el mensaje.


 The two side panels are raised with some foam fun to give some dimension to that “window” created with the two strips.

Los dos paneles laterales los levanté con un poco de goma Eva para darle cierta dimensión a esa "ventana" creada con las dos tiras.


I hope you like them and that I gave you some ideas, or at least I make you wanna go create something. Have a wonderful day!

Espero que te hayan gustado y que te haya dado algunas ideas, o al menos te haga querer ir a crear algo. ¡Qué tengas día genial!

Gaby


Friday, July 3, 2020

Seasonal scene building Cards


Hello everybody!

My cards for today are more creations to add to my classes for my Altenew certification. As I have said before, I´m taking their full program and I’m very excited how it has encouraged me to create and enjoy my crafting time.

¡Hola todos!

Mis tarjetas para hoy son más creaciones para completar mis clases de la certificación de Altenew. Como he dicho antes, estoy haciendo su programa completo y estoy muy emocionada de cómo me ha animado a crear y disfrutar mi tiempo de manualidades.


 Nichol Mogouirk was in charge of this class, she showed several ways to build various kinds of scenes using different techniques. For my class project I decided to make a window card that shows a spring scene inside.

Nichol Mogouirk estuvo a cargo de esta clase, ella demostró varias formas de construir tipos de escenas usando diferentes técnicas. Para mi proyecto de esta clase, decidí hacer una tarjeta con una ventana que muestra una escena de primavera en el interior.


I created the window with rectangles dies, stacking them up to give it more dimension. The cute scene inside I made it using two stamp sets (Painted butterflies and Vintage flowers), I also used some Altenew Inks to blend the background, they blend very easily.

Creé la ventana con troqueles rectangulares, apilándolos para darle mayor dimensión. La linda escena en el interior la hice usando dos sets de sellos (Painted butterflies and Vintage flowers), también usé tintas Altenew para mezclar el fondo, se mezclan muy fácilmente.


The window is quite big so there is not much room for writing a personal message, to fix this I decided to paste the scene like a notecard inside the card, so when you open the card you see the whole scene and you lift it to reveal a nice white area for writing the message.

La ventana es bastante grande, por lo que no hay mucho espacio para escribir un mensaje personal en el interior. Para solucionarlo, decidí pegar la escena como una tarjeta dentro de la tarjeta, así que cuando la abres, ves toda la escena y la levantas para revelar una bonita zona blanca para escribir el mensaje.


I hope you like them and that I gave you some ideas, or at least I make you wanna go create something. Have a wonderful day!

Espero que te hayan gustado y que te haya dado algunas ideas, o al menos te haga querer ir a crear algo. ¡Qué tengas día genial!

Gaby

Wednesday, June 17, 2020

Irresistible Inking Techniques Cards


Hello everybody!

My cards for today are more creations to add to my classes for my Altenew certification. As I have said before, I´m taking their full program and I’m very excited how it has encouraged me to create and enjoy my crafting time.

¡Hola todos!

Mis tarjetas para hoy son más creaciones para completar mis clases de la certificación de Altenew. Como he dicho antes, estoy haciendo su programa completo y estoy muy emocionada de cómo me ha animado a crear y disfrutar mi tiempo de manualidades.


Today´s projects were inspired by the class called “Irresistible Inking Techniques” lead by Sara Naumann. She gives a great variety of ideas on how to use ink other than just stamping with it, which opens a great door of new techniques and ways to stretch our supplies. But more importantly, I think it unlocks our creativity.

Los proyectos de hoy están inspirados en la clase llamada " Irresistible Inking Techniques" dirigida por Sara Naumann. Da una gran variedad de ideas sobre cómo usar las tintas además del simple estampado o sellado, lo que abre una gran puerta de nuevas técnicas y formas de darle más uso nuestros materiales. Pero lo más importante, creo que desbloquea la creatividad.


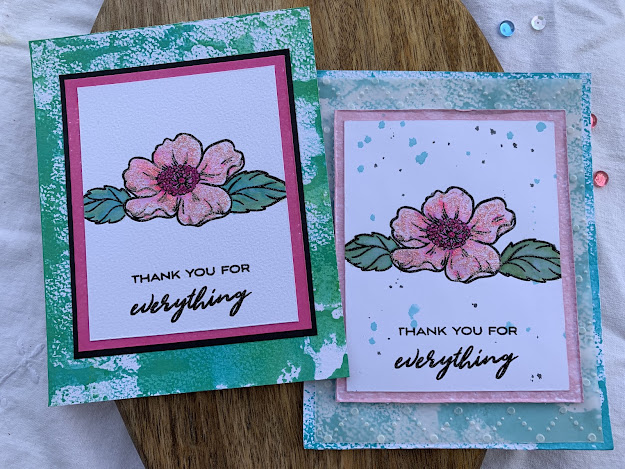
I made two cards with a very similar idea, but I softened the look on one by adding a layer of vellum, and the other one I left the colors in a bolder way. I followed most of the ideas Sara shared on one of her cards as I wanted to get out of my comfort zone, I created the cards using techniques and ideas that don´t usually apply, specially the layers and mats.

Hice dos tarjetas con una idea muy similar, pero suavicé el aspecto de una agregando una capa de papel cebolla, y la otra dejé los colores más vivos. Seguí la mayoría de las ideas que Sara compartió en una de sus tarjetas, ya que quería salir de mi zona de confort, creé las tarjetas utilizando técnicas e ideas que generalmente no aplico, especialmente las capas y los marcos o bordes.


I used the “Always There” stamp set for the flowers and leaves and also for the sentiment. I kept the design very simple because I knew there was going to be a lot of colors and ink everywhere. And to be honest…those Altenew gorgeous flowers don’t need much to look great on a card.

Usé el set de sellos " Always There" para las flores y las hojas y también para el mensaje. Mantuve el diseño muy simple porque sabía que habría muchos colores y tinta por todas partes. Y para ser honesta ... esas hermosas flores de Altenew no necesitan mucho para verse bien en una tarjeta.


I hope you like them and that I gave you some ideas, or at least I make you wanna go create something. Have a wonderful day!

Espero que te hayan gustado y que te haya dado algunas ideas, o al menos te haga querer ir a crear algo. ¡Qué tengas día genial!


Thursday, May 28, 2020

Celebrations: stencil techniques Card

Hello everybody!
Today I bring another card I made to keep working with my certification with Altenew, AECP. They offer many classes at their website which are really nice, I have taken a few classes over last few years but now I decided to go with the full certification. I´m already towards the end of the first level.
¡Hola todos!
Hoy traigo otra tarjeta que hice para seguir trabajando para mi certificación con Altenew, AECP. Ofrecen muchas clases en su sitio web que son realmente agradables, he tomado algunas clases en los últimos años, pero ahora decidí ir con la certificación completa. Ya estoy cerca del final del primer nivel.

The class for today’s card is called “Celebrations: stencil techniques” and its wonderful host is Laurel Beard. During this class we explored different ways to use stencils, which is really fun as it involves more “messy” stuff.
La clase para la tarjeta de hoy se llama " Celebrations: stencil techniques " y su maravillosa anfitriona es Laurel Beard. Durante esta clase exploramos diferentes formas de usar plantillas, lo cual es realmente divertido ya que involucra más cosas "desastrosas" jaja.
I fell in love with the technique of stamping with a stencil, it´s an arty style that in my opinion looks quite beautiful. I used some blue and green Altenew Inks, they react very well with water, making this technique work nicely. The stencil I used I created it with my Silhoutte Cameo. I had fun creating different panels, now I have many to keep making more cards.
Me enamoré de la técnica de estampar con una plantilla, es un estilo artístico que en mi opinión se ve bastante bonito. Utilicé algunas tintas Altenew azules y verdes, reaccionan muy bien con agua, haciendo que esta técnica funcione bien. La plantilla que utilicé la creé con mi Silhoutte Cameo. Me divertí creando paneles diferentes, ahora tengo muchos para seguir haciendo más tarjetas.
For today´s card I got one of the panels and die cut a window towards the bottom-right corner. I stamped the different layers of the cute flowers and leaves from “Painted Bloom” stamp set from Altenew and cut them out. Before assembling the card, I stamped a few leaves (Beautiful Day Stamp Set) that would finish decorating the window. I adhered some flowers flat on the card and others with dimension with fun foam, the panel is also raised with fun foam so there is some depth in the little window. I added some sparkle to the flowers with Ranger stickles. 
Para la tarjeta de hoy utilicé uno de los paneles que hice y troquelé una ventana hacia la esquina inferior derecha. Estampé las diferentes capas de las flores del set de sellos "Painted Bloom" de Altenew y las recorté. Antes de armar la tarjeta, sellé algunas hojas (Beautiful Day Stamp Set) que terminarían de decorar la ventana. Pegué algunas flores planas en la tarjeta y otras con dimensión con goma eva, el panel también está elevado para que haya algo de profundidad en la pequeña ventana. Agregué un poco de brillo a las flores con Ranger Stickles.
In order to complete my card, I white heat embossed my greeting on a strip of black cardstock (Painted Butterflies Stamp Set). I felt like the card needed another black element to tie the whole design in, so I added a black mat and black splatters.
Para completar mi tarjeta, puse el mensaje en una tira de cartulina negra con embossing de calor en color blanco (Painted Butterflies Stamp Set). Sentí que necesitaba un poco de otro elemento negro para unir todo el diseño, así que agregué salpicaduras y un borde negro.

I hope you like them and that I gave you some ideas, or at least I make you wanna go create something. Have a wonderful day!
Espero que te hayan gustado y que te haya dado algunas ideas, o al menos te haga querer ir a crear algo. ¡Qué tengas día genial!