Friday, December 4, 2015

DIY Christmas ornaments video tutorial. Adornos de Navidad

I wanted to make a special gift for the close family, so I came up with the idea of making some Christmas ornaments with my kiddos photographs, and since recently I got the FUSE I wanted to use it...so here they are.
Quería hacer algún regalito especial para la familia, así que se me ocurrió hacer adornos de navidad con fotos de los niños, y como me he comprado recientemente la FUSE tenía ganas de usarla...así que aquí están los adornos que hice.
They are not too fancy or special but having the children´s photos makes them extra awesome. And they do look great hanging on the christmas tree.
No son muy lujosos o especiales pero el hecho de tener fotos de los peques los hace extra impresionantes ;) Y se ven muy bien en el arbolito de navidad.

Here is a video tutorial showing how I made them.
Aquí le dejo un video con el turorial de cómo los hice.


I didn´t want to waste time printing photos so I went through the pile of pictures I had and used them, at first I thought it was important to have christmasy or wintery pictures, but then I realised that most of the photo was going to be cropped. So I used what I had.
No quería perder mucho tiempo imprimiendo fotos, así que revisé el montón que tengo y las utilicé, al principio pensaba que tenían que ser fotos navideñas o de invierno, pero luego me di cuenta que iba a cortar casi todo el fondo. Así que usé lo que tenía.


 They are quite fast to make once you get the hang of the FUSE, it just takes a little bit of practice and testing on the different thicknesses and quality of the plastic you are fusing. I even tried it on the plastic bags from some of the packaging and it worked in most of them. So don´t be afraid of trying it out to save some money using materials you were going to throw away.
Son bastante rápidos de hacer una vez que le coges el truquillo a la FUSE, solo toma un poquito de práctica y pruebas con el grosor y calidad de los plásticos. Hasta probé con el plástico de algunos paquetes y funcionó en la mayoría. Así que no tengas miedo de probar para ahorrar dinero usando materiales que ibas a tirar.


Now I´m thinking to make a card to put them inside, I hope I have the time to make them and mail them on time.
Ahora estoy pensando en hacer unas tarjetas para meterlos, espero que me dé tiempo de hacerlas para luego llevarlas a correos a tiempo.

Saturday, November 28, 2015

Color burst backgrounds: so fun!

I got a set of color burst, they are so much fun to use. And I love the fact that you can never tell how they are going to react with water. The results are amazing.
Me compré un set de color burst, son muy divertidos de usar. Y lo que más me gusta es que nunca se sabe cómo van a reaccionar con el agua. Los resultados son increíbles.
I used a mix media paper to try them out. Watercolor paper works best.
Utilicé papel para mix media para probarlos. Papel para acuarelas es el más indicado.
It´s got a bit of texture...it´s not that visible on the photo.
Tiene un poco de textura...no se ve muy bien en la foto.
I sprayed some water on both sides of the paper to help keep it flat.
Pulvericé un poco de agua en ambos lados para tratar que se quede plano.
First it curves up...
Primero se enrolla hacia arriba...
then it flattens out when you spray the back side as well.
y luego se aplana cuando se le pulveriza agua por el otro lado también.
Now let the fun begin!
¡Y ahora a divertirme!
Little by little I added some of the powder.
Poco a poco le puse un poco de los polvos.
Mixed two colors.
Mezclé dos colores.
Sprayed more water. At this point it´s almost mandatory to stare at it as the colors move around amazingly.
Pulvericé más agua. En este punto es casi obligatorio detenerse a ver para apreciar como los colores se mueven tan maravillosamente.
More colors... More water...Tilting it...
Más colores... Más agua... Inclinarlo...
Move it it around.
Moverlo un poco.
And keep playing...
Y seguir jugando...

Here I decided to press it against another paper to get both painted.
Aquí decidí presionarlo a otro papel para que ambos quedaran pintados.


I love the results...I can´t wait to play some more with these.
Me encantan los resultados...Espero poder jugar pronto con ellos nuevamente.

Wednesday, November 25, 2015

Starbucks Fall Cup Card

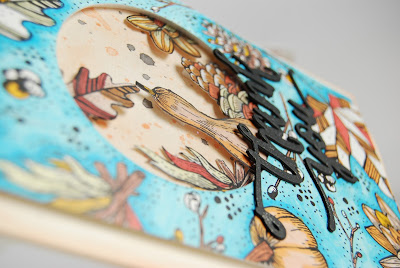
As soon as I saw the Starbucks fall cup I knew there was something I could do with it. A couple of weeks later I saw a project by Kathy Racoosin turning the cup into a card. I gave it a go and the result is amazing.
Tan pronto como vi el vaso nuevo de otoño de Starbucks sabía que había algo que podía hacer con él. Unas semanas después vi el proyecto que hizo Kathy Racoosin donde convertía el vaso en una linda tarjeta. Decidí intentarlo y el resultado es fenomenal.
I cut it up, flatten it and used Copic markers to color the cup.
Lo corté, aplané y utilicé rotuladores Copic para colorear el vaso.
I cut out some shapes that were on the side I was´t going to include in my panel and used them to decorate the window. The Starbucks logo was where the window is now; some of the shapes are pasted flat on the card base some are raised a bit to give it more dimension.
Recorté algunas figuras del borde que no iba a utilizar en el panel de la tarjeta y los utilicé para decorar la ventana. El logo de Starbucks estaba donde está la ventana ahora; algunas de las figuras que corté las pegué directamente en la base y otras un poco levantadas para darle profundidad.
I die cut out the sentiment a few times out of back cardstock, and glue them together to make thicker letters. And added some shimmer with a Wink of Stelle clear brush pen.
Para el mensaje utilicé un troquel para cortar cartulina negra, y pegué unas 3 capas para hacerlo más grueso. Y le puse un poco de brillo con el rotulador Wink of Stella clear brush pen.
The card looks amazing. I´ve got a few more cups that I´ll turn into more cards.
La tarjeta es espectacular. Tengo algunos vasitos más que pronto convertiré en tarjetas.

I hope you like it ;)
Espero que te guste ;)

Monday, November 23, 2015

Double LO with Amy Tangerine

I finished the double layout I started at Amy Tangerine´s workshop at SomosScrap event at the beginning of November. I really love how it turned out!!!
Terminé el layout doble que comencé en el taller de Amy Tangerine en el evento SomosScrap a principios de noviembre. ¡¡¡Me encanta como quedó!!!

I love the cute frames for the photos, they are gorgeous and made it simple to make the photographs stand out.
Me encantaron los marcos para las fotos, son hermosos y hacen que fácilmente se destaquen las fotos.
Almost every single element on the design belong to Amy´s collection (Rise & Shine), so it was very easy to put it together as I did´t have to worry about matching colors or anything, whatever I picked up matched...
Casi todos los elementos del diseño pertenecen a la colección de Amy (Rise & Shine), así que fue muy fácil hacerlo porque no me tuve que preocupar si los colores combinaban, lo que cogiera del paquete combinaba...


I love it, I hope you like it too ;)
Me fascina, espero que te guste también ;)

Sunday, November 22, 2015

Butterfly Kisses Card


I had some left over pieces on my desk and I put together this card.
Tenía un montón de sobras de otros proyectos e hice esta tarjeta con ellos.
I had the watercolor panel from a set of cards I made HERE, and I had already done the stitching around. The rest of the pieces were left from another project where I die cut butterflies, frames and others out of cardboard.
El fondo con acuarelas me había sobrado cuando hice otras tarjetas AQUI, y ya le había hecho la costura alrededor. El resto de piezas me había sobrado de otro proyecto donde troquelé un montón de mariposas, marcos y otros en cartón.

I hope you like it ;)
Espero que te guste ;)