Today´s card was inspired by an image from Pinterest, is from Pinterest Inspired Challenge. I ran into this challenge by coincidence, and I really liked the inspiration image. So here I am with my creation.
La tarjeta de hoy fue inspirada en una imagen de Pinterest, es de un reto llamado Pinterest Inspired Challenge. Me lo encontré por casualidad, y la verdad que me encantó la imagen de inspiración. Así que aquí estoy con mi creación.
This is the Pinterest Inspired image.
Aquí está la imagen de inspiración de Pinterest.
I love the triangles on the image, but I wanted to use them in a more random way. I masked the watercolor paper with triangles in different sizes, I cut them with scissors using freezer paper. Then I ironed the triangles all over the panel and then watercolor with similar colors from the image.
Me encantan los triángulos de la imagen, pero quería usarlos un poco más al azar. Cubrí el papel de acuarelas con triángulos de diferentes tamaños, usé papel de congelador y los corté con tijeras. Con la plancha los adherí al papel y con colores similares de acuarela pinté el panel.
I love the imperfection of the watercolor, specially the red paint on the bottom area.
Me encantan las imperfecciones de las acuarelas, especialmente del color rojo en la parte de abajo.
I hope you like it ;)
Espero que les guste ;)
Monday, September 21, 2015
Thursday, September 17, 2015
Shaker Card Tutorial Video using craft foam. Tarjeta Shaker con goma eva
Today I have a special project to share with you. I made a shaker card using craft foam. I wanted to create it in a way that my daughter could do all by herself, she loves sitting with me and copy what I do. I think the way I share on the video is a bit easier than what we have seen around.
Hoy tengo un proyecto muy especial para compartir. Hice una tarjeta shaker utilizando goma eva. Quería crearla en una forma que mi hija pudiera hacerla sola, a ella le encanta sentarse a trabajar conmigo copiando lo que voy haciendo. Creo que la forma de hacerla que compartimos en el video es un poco más fácil de lo que hemos por ahí.
Here you can see the video. My cute girl helped me a lot in the creation of this video, she´s awesome!
Aquí pueden ver el video. My tierna hija me ayudó much en la creación del video, ¡ella es lo máximo!
Labels:
card,
die cuts,
embossing,
shaker card,
simple tutorial,
watercolor
Saturday, September 12, 2015
You are very special Card, challenge
My creation today is a card for Simon Says Stamp Wednesday Challenge: use a stamp.
Mi creación del día de hoy es una tarjeta para el reto de los miércoles de Simon Says Stamp: usar un sello.
I wanted to create a card similar to one made by Kristina Werner (click on her name if you want to see the card I used as inspiration), I liked the loose watercoloring style and the gold embossing, I don´t like gold but I loved it in her card so I wanted to give it a go.
Quería hacer una tarjeta parecida a una que hizo Kristina Werner (haz click en su nombre si quieres ver la tarjeta en la que me he inspirado), me encantó el estilo de acuarela desenfadado y el relieve con dorado, nunca me ha gustado el dorado pero me encantó como se veía en su tarjeta, así que decidí intentarlo.
I used gelatos for stamping the flowers, spraying a tiny bit of water. The flowers are from an old stamp set by Stephanie Barnard. Then I embossed the outline of each flower and the sentiment with gold embossing powder. The sentiment is from a Simon Says Stamp set called ¨very special¨
Utilicé gelatos para estampar el sello de flores, pulverizando un poco de agua. Las flores son de un set viejo de Stephanie Barnard. Luego hice los relieves de los bordes de las flores y el mensaje con polvos dorados. El mensaje es de un set de Simon Says Stamp llamado ¨very special¨
I love the white areas in the coloring.
Me encantan los espacios blancos que quedaron al ¨colorear¨
I hope you like it ;)
Espero que les guste;)
Friday, September 11, 2015
Happy Birthday Card, challenge
This is my creation for Simon Says Stamp Monday Challenge, this week the theme is Stamp and punch/die cut.
Esta es mu creación para el reto de los lunes de Simon Says Stamp, esta semana el tema es sellar y troquelar.
I stamped this zig zag background with distress inks using a Simon Says Stamp set called ¨very special¨. After I stamped the whole background I sprayed a bit go water to get the ink moving a bit. And the Happy Birthday spam is from another set called ¨more sketchy banner greetings¨
Para hacer el fondo sellé varias veces con un sello de zig zag de Simon Says Stamp llamado ¨very special¨ Luego de haber estampado todo el fondo pulvericé un poco de agua para cativar la tinta y que se moviera un poco. Y el sello del mensaje de la tarjeta también es de Simon Says Stamp de un set llamado ¨more sketchy banner greetings¨
For the die cutting part of the stamp I used a Sizzix die to cut out this fancy frame, and I also die cut a heart with the extra pieces of the background I created initially. I embossed the border with a Lawn fawn die called stitched borders, just to add a finishing touch.
Para la parte de troquelado del reto utilicé un troquel de Sizzix para cortar este lindo marco, y también troquelé un corazón con lo que sobraba del panel que había creado. Luego le hice un grabado en el borde de la tarjeta con un troquel de Lawn fawn llamado stitched borders, para agregarle el toque final.
I hope you like it ;)
Espero que les guste ;)
Wednesday, September 9, 2015
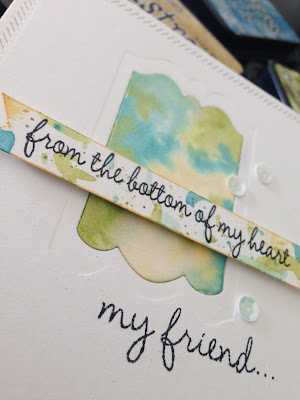
From the bottom of my heart Card
For today´s project I decided to combine 2 challenges again. I really enjoyed what I did on THIS card incorporating themes from 2 different challenges. So here I go again.
Para mi proyecto de hoy decidí combinar 2 retos otra vez. Me gustó mucho lo que hice en ESTA tarjeta incorporando elementos de dos retos diferentes. Así que aquí voy otra vez.
Simon Says Stamp Monday Challenge proposed using a ¨trio of colors¨, so I went for blue, yellow and green combo.
Simon Says Stamp Monday Challenge propuso utilizar un trío de colores, me fui por un como de azul, amarillo y verde.
For my card design I used the sketch provided by CAS(E) in this week´s challenge.
Para el diseño de mi tarjeta utilicé el boceto que propuso CAS(E) en el reto de esta semana.
To make this card I die cut the small frame in the upper center of my card out of watercolor cardstock, then I used a stitched die to emboss all 4 borders of the front panel.
Para hacer esta tarjeta utilicé cartullina para acuarela, y troquelé en forma de marco la parte superior central de la tarjeta, y otro troquel para grabar los 4 bordes con un diseño de pespuntes.
Then painted the die cut frame using distress inks as watercolors. I used a trio of colors: scattered straw, peeled paint and broken china. Also painted and splashed some of these colors on a strip of papers for the sentiment.
Luego pinté el marco que corté utilizando tintas distress como acuarelas. Utilicé un trio de colores: scattered straw, peeled paint y broken china. También pinté y salpiqué con estos colores una tira de papel de acuarela para el mensaje.
I stamped the sentiment on the strip and the panel. Then I glued the panel to a card base and the frame in laid back in its place, for a one layer effect. I put some foam tape to the sentiment and added across the focal point of the card. Added a couple of white sequins and done!
Sellé el mensaje en la tira de cartulina y en el panel de la tarjeta. Luego adherí el panel a una base de tarjeta y el marco lo puse en el sitio de donde lo corté para un efecto de una sola capa. La tira con el mensaje la pegué por encima del punto focal de la tarjeta. Le puse algunas lentejuelas blancas y lista!
I hope you like it ;)
Espero que les guste ;)
Tuesday, September 8, 2015
Happy Day Card
 Today I have a new project that I made to participate in 2 challenges. The first one is Simon Says Stamp Wednesday Challenge, their theme this week was ¨Make it colorful¨
The other challenge I wanted to join is Virginia´s View Challenge, I found it through Laura Bassen´s blog and I really liked the theme: Geometric Patterns.
I thought these 2 challenges were perfect to be combined: geometric colorful patterns!!!
Hoy tengo un nuevo proyecto que hice para participar en 2 retos. El primero es de Simon Says Stamp Wednesday Challenge, su tema esta semana es de muchos colores (Make it colorful).
El otro reto en el que quería participar se llama Virginia´s View Challenge, que lo encontré a través del blog de Laura Bassen, el tema me fascinó: Patrones Geométricos (Geometric Patterns).
Me pareció que estos dos retos serían una combinación perfecta: patrones geométricos coloridos!!!
Comencé recolectando restos de papeles para acuarelas en tiras largas, que me sobraban de otros proyectos.
Los corté con diferentes grosores.
Después utilicé una base de tarjeta para medir cuantas tiras necesitaba para cubrir una tarjeta.
Las fijé a una tabla con cinta de carrocero.
Hice unas pruebas de color con rotuladores distress. Garabateaba en una superficie lisa para luego recoger el color con un pincel para acuarelas mojado.
Cuando encontré los colores que me gustaban utilicé el papel de pruebas como mi guía.
Pinté cada tira con un color diferente, las dejé secar y luego hice una segunda capa de color.
Hice unos salpicados con tinta distress negra, le agregué mucha agua y salpiqué con un pincel todas las tiras. Les di un toque con la pistola de calor para acelerar el tiempo de secado.
Luego corté las tiras de diferentes tamaños, unos fueron al azar y otros medidos para que no se alinearan unas con otros.
Con una escuadra con ángulo recto me ayudé a colocar la primera fila. Me aseguré de proteger la parte trasera de la tarjeta con unas post-it.
I carefully aligned each row, pasting them down row by row.
Con mucho cuidado fui alineando cada fila, pegando fila por fila.
Me aseguré que todo estuviera bien derechito antes de presionar fuerte todas las filas.
Luego llegó el turno del mensaje de mi tarjeta.
I die cut the word ¨happy¨ and some letters to spell the word ¨day¨ using black cardstock.
Utilicé un troquel para cortar la palabra ¨happy¨ y otros troqueles de letras para la palabra ¨day¨ usando cartulina negra.
Luego las pegué hacia el lado izquierdo bajo de la tarjeta y le puse una tira finita a lo ancho de la tarjeta en la parte de abajo para darle un poco de balance a todo el diseño.
The watercolor paper I used is very thick, it gives lots of dimension to the card but it doesn’t make it bulky.
El paper para acuarelas que utilicé es bastante grueso, eso le da mucha dimensión a la tarjeta sin hacerla muy abultada.
I hope you like it ;)
Espero que les guste ;)
Labels:
card,
challenge,
die cuts,
greetings,
painting,
simple tutorial,
watercolor
Sunday, September 6, 2015
Mini album with gelato's kit
I got some gelatos that come with a small kit to make a mini album, every page is a different texture or material, the idea is to experiment with the gelatos and explore their qualities. I had so much fun!!!
Me compré unos gelatos que traen un pequeño kit para hacer un mini album, cada página tiene diferente textura o material, la idea es experimentar con los gelatos y explorar sus cualidades. Me divertí un montón jugando con ellos!!!
I love how it turned out because I was experimenting with the gelatos I wasn't thinking about the results, I was just playing with all the colors and mixing, and adding more and wiping off...
Me encanta como como quedó porque como estaba experimentando con los gelatos no estaba pensando en el resultado, solo estaba jugando con todos los colores, mezclando, agregando más, quitando...
I called it "Palabras" (words) because I wanted to use some random frases I had been collecting. I printed them out on cardstock and stuck them here and there.
Lo he llamado "Palabras" porque quería usar una frases que he estado recolectando. Las imprimí en cartulina y las pegué al album.
I hope you like it ;)
Espero que les guste ;)
Labels:
canvas,
chipboard,
gelatos,
mini album,
mixed media,
painting
Subscribe to:
Posts (Atom)


