Hello everybody!
Today I bring another project I made to keep working with my certification with Altenew, AECP. They offer many classes at their website which are really nice, I have taken a few classes over last few years but now I decided to go with the full certification. They offer a few free classes if you would like to know how they are and see for yourself if this is something for you.
¡Hola a todos!
Hoy traigo otro proyecto que hice para seguir trabajando en mi certificación con Altenew, AECP. Ellos ofrecen muchas clases en su página web y son realmente agradables, he ido tomando algunas clases en los últimos años, pero ahora decidí ir por la certificación completa. Ofrecen algunas clases gratuitas si te interesa saber cómo son y ver si es algo para ti.
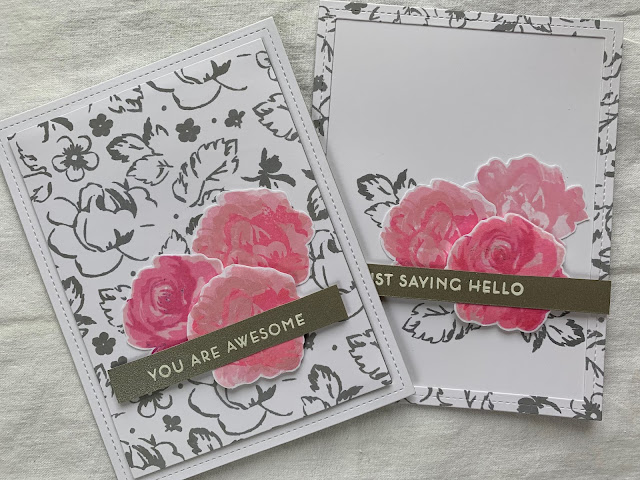
Today´s cards display my work for the “All About Layering 1” class, this class is one of the free classes they offer at Altenew Academy. It`s a class dedicated to show how to layer stamps, Altenew has a wide range of this “magical” stamps, I call them magical because I love seeing how the image gets better and better with each impression. If you haven’t seen this kind of stamps you should check them out.
Las tarjetas de hoy muestran mi trabajo para la clase "All About Layering 1", ésta es una de las clases gratuitas que ofrecen en Altenew Academy. Hay un "pequeño" detalle a considerar, y es que son clases en inglés. Es una clase dedicada a mostrar cómo superponer sellos, Altenew tiene una amplia gama de sellos "mágicos", los llamo mágicos porque me encanta ver cómo la imagen mejora y mejora con cada impresión de las capas que traen. Si no has visto este tipo de sellos, deberías hacerlo, quedan espectaculares.
I used the “Vintage Flowers” stamp set, I got my stamp positioner and played a lot to figure out the right position for each layer and to decide on the colors I wanted to use. I decided to use the “Cherry Blossoms” mini cube ink set, which are in the pink family.
After stamping many of the 2 bigger flowers from the set I fuzzy cut them. I really liked how they turned out but when I was assembling the card, I felt like I wanted to use more of the stamps for my cards. So remembered my previous card, where I repeated images with grey ink for the background and decided to do something similar.
Utilicé el set de sellos "Vintage Flowers", estuve “jugando” con mi posicionador de sellos para encontrar la posición correcta de cada capa y decidir los colores que quería usar. Decidí usar el set de tintas en mini cubos "Cherry Blossoms", que pertenecen a la familia del color rosa.
Después de sellar muchas flores con sus diferentes capas (las 2 flores más grandes de este set) las recorté con cuidado, dejando un borde pequeñito. Realmente me gustó cómo quedaron, pero cuando estaba tratando de armar la tarjeta, sentí que quería usar más sellos del set. Entonces recordé mi tarjeta anterior, donde repetí imágenes con tinta gris para el fondo y decidí hacer algo similar.
I stamped 2 panels with grey ink, on one I used the more solid images of the leaves and on the other the outlines of leaves and some flowers. Then I cut them out using a stitched frame die, the initial plan was to use the whole frame and inner part for a card, but I thought it could work if I split them into 2 cards. So, 2 cards have the frames and the other 2 have the inner portion.
Sellé las imágenes en 2 páneles con tinta gris, en uno usé las imágenes más sólidas de las hojas y en el otro los contornos de las hojas y algunas flores. Luego los corté usando un troquel de marco, el plan inicial era usar todo el marco y la parte interna para una tarjeta, pero pensé que podría funcionar si los dividía en 2 tarjetas. Entonces, 2 tarjetas tienen los marcos y las otras 2 tienen la porción interna.
The cards that use the frames needed a bit more love, so I stamped some leaves behind my main flowers, using the same grey ink on a white panel.
I white heat embossed some sentiments on silver cardstock, they are from the “Painted Butterflies” stamp set, I just love how clean and graphic they are. For each card, I adhered 2 flowers flat on the panel and the third one with a bit of foam tape. And the sentiment on top. I also added some shimmer to the flowers with a “Wink of Stella clear glitter brush pen”
Las tarjetas que usan los marcos necesitaban un poco más de cariño, así que sellé algunas hojas para simular que quedan detrás de las flores principales, usando la misma tinta gris en un panel blanco.
Los mensajes los hice con embossing blanco en cartulina plateada, son del set de sellos "Painted Burtterflies", me encanta lo limpios y gráficos que son. Para cada tarjeta, pegué 2 flores directamente en el panel y la tercera con un poco de goma eva. Y el mensaje encima. También agregué un poco de brillo a las flores con un “Wink of Stella clear glitter brush pen”
I hope you like them and that I gave you some ideas, or at least I make you wanna go create something. Have a wonderful day!
Espero que te hayan gustado y que te haya dado algunas ideas, o al menos te haga querer ir a crear algo. ¡Qué tengas día genial!


Very cute
ReplyDeleteLovely!
ReplyDeleteWOW! Your cards look fabulous! I love the colour palette too! Loved reading the detailed post and looking at so many photos!
ReplyDeleteThank you for entering your work to the AECP assignment gallery.
Que bellezas, GABY - son elegantes 👏🏼
ReplyDelete