Wednesday, December 12, 2012

Cool Dani Layout

 I finally made a layout. This is what I like the most doing and it’s what I do the least…
Por fin hice una página. Esto es lo que más me gusta hacer y es lo que menos hago…
I found some old photos that I planned to scrap a long time ago and sat down to work on them.
Encontré unas fotos Viejas que había planeado scrapear hace tiempo y me puse a trabajar.

 I used very little supplies, just played with the pattern papers and added some stitching.
Utilicé muy pocas cosas, jugué con los papeles dibujados y costuras.

 My daughter came up with the tittle and I cut it out using my sidekick with the Curlz dies.
Mi hija me dijo qué título ponerle y lo corté con mi sidekick con los troqueles Curlz.

 Everytthing else came in the same pack of papers. K & Company, KP Blossom Designer paper pad, 12 x 12.
Todo lo demás lo saqué del mismo paquete de papeles. K & Company, KP Blossom Designer paper pad, 12 x 12.

Thursday, December 6, 2012

Fridge magnets


This is a little gift I made for a friend. She is my colleague and I wanted to make something special to show her how much I appreciate her making my life easier, professional and personally.
I made some Christmas fridge magnets that spell her name. I don’t think she reads my blog so I can post it before her birthday…and if she does I’m sure she’ll act surprised!
Este es un pequeño regalo que hice para una amiga. Es mi colega y quería hacerle algo especial para demostrarle lo agradecida que estoy por hacer mi vida profesional y personal mucho más fácil en este país.
Hice unos imanes para el refrigerador con las letras de su nombre. Yo no creo que ella lea mi blog así que lo puedo mostrar antes de su cumple...y si lo lee estoy segura que va a hacerse la sorprendida!


It was simple to make them. I punched some 2” circles of a Christamas pattern paper, then punched some 1” circles of a solid green. I tried different shades to see which one matched better.

Hacerlos fue muy sencillo. Usé un troquel de 2" para hacer varios círculos en papel decorado de Navidad. Y otro troquel de 1" para círculos de papel verde, probé con varias tonalidades a ver cual combinada mejor.

Then pasted each letter of her name on the green circles, I used red letters stickers. And glue each one to the bigger circles. This was to make sure the letters were going to stand out from the busy background.

Luego pegué cada letra de su nombre en los círculos verdes, utilicé pegatinas de letras rojas. Y luego lo pegué sobre los círculos grandes. Esto fue para asegurarme que las letras se destacaran del fondo Navideño.


Then I added some diamond stickles to give it some Christmassy glimmer.
También le puse un poco de Diamond Stickles para darle brillo Navideño.

 Next I heat embossed some clear UTEE over the whole surface, I adhered a long piece of cardstock with washi tape to avoid burns. I didn’t use tweezers because it would have left the mark on top of the circles, I wanted a smooth even surface. I did 3 layers and then added a bit of powder here and there to fill any holes and used my heating tool moving the circles from side to side making the top even.
This part is my family’s favorite, they love watching how the powder melts and becomes shiny and beautiful, we call it the magic part :)

 Después le hice 3 capas de UTEE transparente sobre toda la superficie de cada círculo. Le pegué un listón de cartulina con washi tape para evitar quemarme. No utilicé una pinza para que no quedara la marca, quería que me quedara una superficie lisa. Luego de las 3 capas agregaba un poquito del polvo en los huequitos que quedaban y movía la pieza de lado a lado mientras le pasaba la pistola de calor para que quedara uniforme. Esta es la parte favorita de mi familia, les encanta ver como se derrite el polvo y se convierte en una pieza brillante y linda, lo llamamos "the magic part"

I adhered some magnetic strips on the back and voila!
I found a cute little box with the perfect size and decorated it with the same patterned paper.
I hope she likes them! 
Le puse unas tiras magnéticas por detrás y Voila!
Encontré una cajita del tamaño perfecto y la decoré con el mismo papel.
Espero que le guste!


Thursday, November 22, 2012

my baby boy's album

My baby is not a baby anymore...he's already 4!
I started making this album about 4 years ago...it took me a while!
Oh well, I decided I needed to finish it so I did it.
My son is so proud of the album, he keeps asking questions about his daddy's hair, or his sister looking so much younger; it's amazing to see his face and hear all the cute questions he has when I show him his album.
I made a quick slideshow to show you most of the album.

Mi bebé no ya es un bebé, ya tiene 4 años!
Comencé a hacer este album hace como 4 años...me tomó bastante tiempo!
Decidí terminarlo y por fin lo hice. 
Mi peque está muy orgulloso de su album, pregunta sobre el pelo de su papi, por su hermana que parece bebé. Es fascinante ver su cara y escuchar todas sus preguntas inocentes mientras le muestro el álbum. 
Aquí muestro la mayor parte del álbum en un slideshow.


Tuesday, November 20, 2012

Mini Album we got as a gift

After 3 years without going home we finally went to Venezuela last summer. We had an amazing time sharing with family and friends. This is a beautiful mini-album that I got from my cousin Andrea, she's a gorgeous 13 year-old girl and likes scrapbooking. She made us this album as a way to celebrate the wonderful time we spent together.

I made a slideshow...

Después de 3 años sin ir a nuestro país, por fin fuimos a Venezuela este verano. La pasamos espectacularmente bien compartiendo con la familia y los amigos. Este hermoso mini álbum me lo dio mi prima Andrea, es una chica guapísima de 13 años y le gusta scrapear. Ella nos hizo este álbum para celebrar los momentos maravillosos que pasamos juntos.

Hice una presentación de fotos...


Saturday, November 17, 2012

Cards inspired on my last Card Class


I enjoyed a lot  Holiday Card Workshop. I wasn't able to create my cards along with the class, but I got enough ideas for my Christmas cards.
I made a set of cards inspired by one of the classes, it was made by Amber Kemp-Gerstel, one of the guest artists; the basic idea is the same, but I made some changes to adapt it to my materials, my goal is to use what I have, and buy what I really need....I know that's a lie but at least I'm trying...haha

Me gustó mucho la clase Holiday Card Workshop. No pude ir haciendo tarjetas durante la clase, pero ahora tengo un montón de ideas para mis tarjetas de Navidad.
Hice un set de tarjetas inspiradas en una de las clases, la hizo Amber Kemp-Gerstel, una de las artistas invitadas; la idea principal es la misma, pero hice algunos cambios para adaptarlo a mis materiales, mi meta es usar lo que tengo, y luego comprar lo que realmente necesito...yo sé que es una mentira, pero por lo menos lo intento, jajaja.

I used my Slice to cut out the Christmas trees using the Falala collection. I used the negative space; the actual trees will be used on other cards. Then cut out some white card stock for the back of the trees and used different techniques to paint them green: watercolor, glimmer mist, dye ink, distress inks; mixing shades of green. I was trying out different looks to see which one was the best. I used a different one for each card.

Primero corté los arbolitos de Navidad usando mi Slice, con la colección Falala. Utilicé los negativos de las siluetas, los arbolitos los voy a usar en otras tarjetas. Luego corté cartulina blanca para la parte de atrás de los arbolitos y utilicé distintas técnicas: acuarelas, glimmer mist, tinta dye, tintas distress; mezclando tonos de verdes. Estaba probando los diferentes resultados para ver cual era el mejor. Utilicé uno diferente para cada tarjeta.

Then I heat embossed different embellishments for the trees, I got them from "cake2build" stamp set from Stamps of Life, I used silver to give it some shine. And I also used the same silver embossing powder to do all my sentiments at once, I used some Hero Arts stamps.

Luego hice emboss con calor usando plateado para hacerlo brillante. Hice los adornos de los arbolitos usando un set de sellos de Stamps of Life, "cake2build", de tortas de bodas. También aproveché de hacer los mensajes de las tarjetas con el mismo plateado, usando sellos de Hero Arts.

I drew hills to represent snow on white plain paper and cut them out to use as a mask to create the background blue color, I used distress inks and the ink blender. I mounted the piece on dimensional adhesive on most of the cards. Added a ribbon to the sentiment, I got the ribbon at Ikea a few years ago. As a final touch I made a line of Diamond Stickles on the top of the snow hills, where the background and snow meet.

Dibujé montañas de nieve en papel blanco y las corté para usarlas de máscaras para crear el azul del fondo, utilicé tintas distress y el "ink blender". Monté la pieza con adhesivo de foamy para darle más dimension, lo hice en casi todas las tarjetas. Le puse una cinta al mensaje, esta cinta la compré hace un par de años en Ikea. También le agregué una linea de Diamond Stickles en el tope de las montañitas de nieve.


All are different sizes and techniques, some I like more than others...they are not master pieces but good enough to make me happy!

Todas son de tamaños y técnicas diferentes, y unas me gustan más que otras...no son obras maestras pero lo suficientemente bonitas para hacerme feliz!

Wednesday, November 7, 2012

Another class...

I haven't had much time to create but I've been taking online classes, my head is full of cute ideas...I hope I can organize my time better and get working.

No he tenido mucho tiempo para crear pero he estado tomando clases online, tengo la cabeza llena de ideas muy lindas...espero poder organizarme mejor para ponerme a crear mis cositas.

I'm taking another card making class, very appropriate for the time as Christmas is coming soon, of course it'll be better if I can actually make something and not only watch the videos and admire their work...It is called "Holiday Card Workshop". I'm enjoying a lot, I hope to create some cards inspired by this class and upload them soon.

Estoy tomando otra clase de tarjetas, muy apropiado para la época porque Navidad está muy cerca, claro que sería mejor si realmente me pusiera a hacer algo y no solo ver los videos y admirar sus trabajos...Se llama "Holiday Card Workshop". Me gusta mucho; espero crear algunas tarjetas inspiradas en esta clase y subirlas pronto.

Friday, October 5, 2012

Happy 40 b-day card


Yesterday I needed to make a birthday card for a friend. She is turning 40 and I wanted a very personalized card, I went through my stash of cards and nothing seemed like made for her; plus I wanted to include that important number 40 on the card. So I made this one. 

Ayer necesitaba hacer una tarjeta para una amiga que estaba cumpliendo 40, yo quería que fuera bastante personalizada pero no conseguí nada en mis tarjetas que pareciera hecho para ella, además quería incluir ese   número 40 de tan importante ocación. Esta fue la tarjeta que hice.


Here is a picture of the process, trying to match patterned paper, stamping, punching, etc.
Esta es una foto del proceso, combinando los papeles decorados, sellando, troquelando, etc.


And this is the detail with number 40. I chose a big brad for the center of the flower so I could fit the number on it. It was tricky to write it as it's a small slick area, so after trying different ways (permanent marker, then white clear embossing to protect it) everything kept smudging the ink and it looked messy; when I was about to give up on the idea of the tiny number I had an Ah ha! moment. I wrote it on a piece of tissue paper, then cut it in a tiny circle and paste it on the brad using glossy accents, and added a thing layer of glossy accents on top to seal it. It's amazing how these small details can make a big difference both in the process as well as the result.

Y este es el detalle del número 40. Escogí un brad grande para el centro de la flor para que cupiera el 40. Estuvo difícil escribirlo porque es un área pequeña y resbalosa, después de intentar varias maneras (marcador permanente, y polvo de embossing transparente) todo salía mal, la tinta se corría y se veía como sucio; cuando ya estaba a punto de darme por vencida se me prendió el bombillo! Lo escribí en papel de seda y recorté un círculo pequeñito, lo pegué con glossy accents y le puse una capa delgada de glossy accents por encima para sellar la superficie. Es impresionante como estos pequeños detalles hacen una diferencia muy grande tanto en el proceso como en el resultado. 

Wednesday, September 26, 2012

Kick Start on line class

I've been MIA...report cards, moving to another apartment, summer holidays, getting back to work, etc...
I joined another on line class, and even though I still don't have time to get crafting I'm enjoying and getting loads of ideas for whenever I organize my time (and my scrap room) to sit dawn and create.


He estado desaparecida en acción...boletas escolares, mudanza para otro apartamento, vacaciones de verano, regresar al trabajo, etc...
Me he apuntado a otra clase online,y a pesar que no tengo tiempo para sentarme a crear estoy disfrutando y recolectando un montón de ideas para cuando organice mi tiempo (y mi tallercito) y ponerme a crear.

Sunday, April 8, 2012

Happy Bday Card for my Hubby

A while ago my children and I made cards for daddy, I knew we were going to be traveling and wanted to make sure we had our cards with us on this special day.
Hace unas semanas hicimos tarjetas para papá, ya sabía que estaríamos viajando y quería asegurarme de tener nuestras tarjetas en este día tan especial.
While looking for materials to make the card I found some old little pictures of funny cows I had stamped, heat embossed and watercolored, they were kind of too colorful for my taste, but my daughter loved them. So I decided to challenge myself and make me create a card using them.
Mientras buscaba materiales para hacer las tarjetas encontré unas imágenes viejas de unas vacas muy graciosas, yo las había sellado, puesto relieve con calor y pintado con acuarelas, eran como demasiado coloridas para mi gusto pero a mi hija le gustaron tanto que decidí retarme a hacer una tarjeta con esas vaquitas.
This is what I came up with:
Este es el resultado:

I'm kind of happy with the result, it looks happy and my children think daddy is going to love it, and that's what makes me happy ;)
Estoy contenta con el resultado, se ve "feliz" y mis niños piensan que a papá le va a encantar y eso es lo que me hace feliz ;)


Wednesday, April 4, 2012

not so girly cards

I needed to make a birthday card for a man, of course every idea I had was still too girly for what I needed it for. Then I found a very nice idea on Kristina Werner's blog and decided to copy her card.
I made two of them to have an extra one for the next time I'm in need of one of those not so girly cards.
Necesitaba hacer una tarjeta de cumpleaños para un hombre, por supuesto cada idea que se me ocurría seguía siendo demasiado femenina para lo que la necesitaba. Luego encontré una idea muy buena en el blog de Kristina Werner y decidí copiar la tarjeta.


 With some of the scraps my daughter made a little card, she decided to change the stars for hearts, it's a tiny beautiful card!
Con las sobras mi hija hizo una tarjetica, quiso cambiar las estrellas por corazones, es una tarjeta pequeñita preciosa!

Tuesday, March 27, 2012

Chemistry 101


I joined Tim Holtz "Creative Chemistry 101" class, it has been wonderful but I haven't had time to experiment techniques and show my tags...yes, tags...Tim loves tags...I like them too.
The class has been interesting as he is taking that chemical approach, so we get to know why certain inks work or not on different surfaces, or things like that, and of course it is full of techniques, many I have seen in the videos he has on his blog but still really cool to see.
It is an online class for two weeks, and we are already on day 2 of the second week...I don't want it to end!

Me metí en la clase de Tim Holz "Creative Chemistry 101", ha sido muy buena pero no he tenido tiempo de experimentar técnicas y mostrar mis "tags", a Tim le encanta trabajar en esas etiquetas, a mi también me gustan.
La clase ha sido interesante porque lo muestra todo desde el punto de vista químico, por ejemplo por qué unas tintas funcionan o no sobre ciertas superficies...cosas por el estilo, y por supuesto está llena de técnicas, que muchas las he visto en los videos de su blog, pero son igual de interesantes.
Es una clase online por dos semanas, ya estamos en el segundo día de la segunda semana...No quiero que se termine!

Wednesday, March 14, 2012

Card classes for grades 3, 4, and 5.

I volunteered to offer an After School Activity, like I didn't have enough at work... I wanted to be related to crafts (OF COURSE) but I didn't want to work with the little ones as that what I do the whole day. So I offered a Card making class for 3rd to 5th graders. Once a week, for 7 crazy weeks ;)

Decidí ofrecer una actividad extra escolar, como si no tengo suficiente trabajo...Quería que estuviera relacionada con manualidades (POR SUPUESTO) pero no quería trabajar con niños pequeños porque es lo que hago todo el día. Así que ofrecí una clase para hacer tarjetas para alumnos entre 3ro y 5to grado. Una vez a la semana, por 7 semanas ;)

I made a quick presentation on prezi.com for the first class, and I think they liked it. Here you can see it.

Hice una presentación en prezi.com para la primera clase, y creo que les gustó. Aquí pueden verla.

I forgot to take photos of their first creations, but they loved them, the girls were very proud of their cards. I took a few photos of the last class (with my phone), and I'll take more of the next few classes.

Se me olvidó tomar fotos de sus primeras creaciones, pero les encantó, las chicas estaban muy orgullosas de sus tarjetas. Tomé algunas fotos de la última clase (con mi teléfono), pienso tomar más en las siguientes clases.


Wednesday, February 29, 2012

Hearts by Daniela


This is what my little one created after I made "Love is all we need" canvas. She got some of the scraps and surprised me with this gorgeous creation. All by herself!

Esto es lo que mi peque creó luego que yo hice el cuadro "Love is all we need". Se quedó con las sobras de mi trabajo y me sorprendió con esta hermosa creación. Todo lo hizo solita!

She asked me to take some pictures of it and post them on my blog, she is so proud of it! and I'm proud of her!!!
Ella me pidió que le tomara foto y lo subiera a mi blog, está muy orgullosa de su trabajo! Y yo orgullosa de ella!!!

Monday, February 13, 2012

Love is all we need


I created this "canvas" this week.
Esta es mi creación de esta semana.


Here I show you how I made it, step by step.
Voy a mostrar como lo hice, paso a paso.
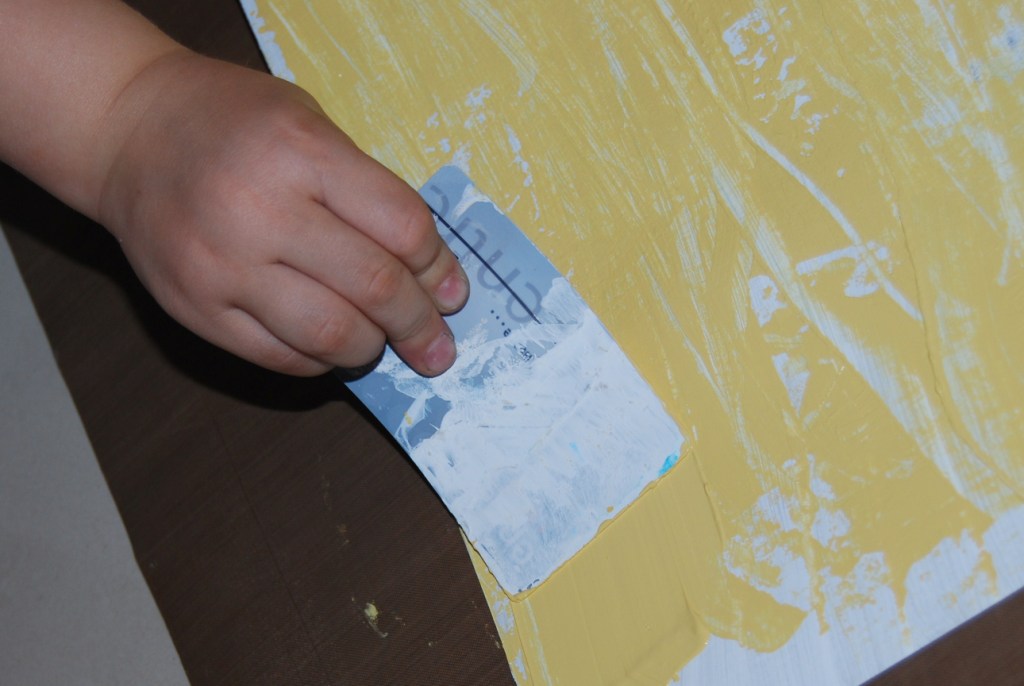
I used the back of paper drawing pad for the base. I primed it with gesso, and painted it light yellow spreading the acrylic paint with a plastic card. I was careless while spreading the paint as I wanted an uneven color with some texture.
Usé la contraportada de un block de dibujo como mi base. Le puse gesso para darle una base, y lo pinté con pintura acrílica amarrilla clara usando una tarjera plástica. No tuve mucho cuidado al aplicar la pintura para que quedara un poco dispareja y con algo de textura.

I got some help from 4 little hands, for painting and taking pics.
Tuve un poco de ayuda de 4 pequeñas manitas, tanto para pintar como para tomar las fotos.

 Added some cream color.
Luego puse un poco de color crema.

I cut strips of a letter a had lying around, from school, I just wanted letters for my background.
I pasted them with gel medium, under and over them. I got annoyed by the brush I picked up, so I ended up doing it with my fingers.....fun!
Corté tiras de una carta que tenía por ahí, del cole, solo quería letras para mi fondo. Las adherí con gel medium, por debajo y por encima. El pincel que había escogido no era muy bueno para esto, así que terminé haciédolo con los dedos...que divertido!

I painted a white wash over the entire page to blend the black & white of the strips into the background.
Luego le hice un "wash" con pintura blanca sobre toda la página, para que el blanco y negro de las tiras de papel de fundieran un poco con el fondo.
Then added a bit of blue...I can't help myself, I love blue and wanted blue on my work. I also spread it with a card and my fingers as well.
Luego un poco de azul...no lo puedo evitar, me encanta el azul y quería azul en mi trabajo.También apliqué la pintura con una tarjeta y mis dedos.
I needed some masks, so I ripped some paper and used the left over (negative part)  from a sticker sheet I use to motivate my students.
Ahora necesitaba unas plantillas o "masks" así que rasgué un poco de papel y el resto de una papeleta de pegatinas (el negativo) que uso en el colegio para motivar a mis alumnos.

I place them in the corners of my project and spayed it with ink.
Las coloqué en las esquinas del projecto y lo pulvericé con tinta.

I used some paper towels to get rid of the excess of ink. I repeated the process all over the page.
Quité el exceso de tinta con toallin de cocina. Repetí el proceso en varias partes de la página.

I splash some red ink around.
Salpiqué con tinta roja por aquí y por allá.
I cut out a heart form scrap card stock, and primed it with gesso.
Corté un corazón de unos restos de cartulina, y le puse gesso.

I used the negative side of the hearts I cut as masks to add some hearts to the page with spayed ink.
Utilicé el negativo de los corazones que corté como "masks" o plantillas para agregar corazones a la página con tinta pulverizada.

Once the gesso on the heart was dry I spayed it with red ink, I did it on top of the project to get another heart in there.
Cuando el guesso del corazón se había secado lo pulvoricé con tinta roja, lo hice encima del projecto para que me quedara otro corazón más.
Later I used the same sticker sheet to add orange circles to the heart. Actually the sticker sheet can be used over and over if you don't leave it wet for too long, just clean it with a paper towel and put it on its back paper.
Luego utilicé la misma papeleta de pegatinas para agregar círculos al corazón. Esa papeleta de pegatinas se puede usar muchas veces sino se deja mojar mucho y se vuelve a poner en el papel donde viene.
I wanted include a woman's silhouette so I found one in a magazine and cut it out. Then I trace it with a pencil directly on my page.
Quería incluir la silueta de una mujer, así que encontré una en una revista y la recorté. Luego tracé el borde, como calcando la imagen, usando un lápiz directamente en la página.

Then I used the negative part of that magazine page  to mask the project and ink only the woman with a bit of butterscotch ink.
Luego usé el negativo de la mujer que recorté para tapar el resto de la página y poder pulverizar tinta solo en el área de la mujer.
Then I painted letters for my tittle, they are canvas texured letters I had from another project. I painted the with ink as well.
Ahora las letras, pinté las letras del títilo con las mismas tintas líquidas que he venido usando, son unas letras con textura de lienzo, que me sobraron de otro projecto.
I highlighted a sentence that I found by coincidence, that went well with my theme. I made a quick frame with the same brush I used for the red letters and traced the black words with a pen.
Resalté una oración que encontré por coincidencia, que le iba bien al tema de mi trabajo. Hice un marco rápidamente con el mismo pincel que pinté las letras rojas y repacé las letras con un marcador negro.
Then glued the word 'we' on the heart.
Luego pegué la palabra 'we' en el corazón.
I wanted to make the letters shiny....ooops....too much glitter glue...oh well...let's try to fix this...
Quería poner las letras brillantes....oooooo noooooo, demasiada glitter glue.....bueno....vamos a ver como lo arreglo...
This is what I ended up with after getting rid of the glitter glue, I wasn't so happy because it took away some of the orange circles I had sprayed. But it looks ok.
Esto fue lo que quedó depués de tratar de salvar el desastre que hice, no estaba muy contenta porque le quitó bastante los círculos anaranjados que le había hecho. Pero no quedó mal.
Then I wrote, or doodled, the rest of my message, and hearts, and outlined the red letters.
Luego escribí y garabateé el resto del mensage, corazones, y repasé el contorno de las letras.

My daughter wanted to add some doodles, she said letters were too hard so she went for hearts.
Aquí también recibí ayuda, mi hija quería agregar detalles y como le parecía muy dificil hacer letras decidió hacer corazones.

 I sprayed one more heart on the bottom-right side, to add a bit of color and balance to the whole page. I also added some strips of burlap behind the main heart to add more texture and glued the heart with dimensional adhesive.
Hice otro corazón rojo hacia abajo en la derecha, para agregar más color y darle un poco de balance a la página. También puse unas tiras de tela de saco detrás del corazón principal para darle textura, y lo puse con relieve.
Here are some detail shots...
Aquí tienen unas tomas de cerca...


Now off to buy a frame!!!
Ahora a comprar un marco!!!