Today I have a very special post, I completed my 10 AECP classes, and now I got a great challenge as a final test to approve level 1. It has been an awesome experience, allowing myself to create is a total gift.
Let´s get to it because I have loads to share. I made a video with all the process, including my creative process, the actual creation of the sets and the packaging.
The challenge consists in creating 2 card sets, a feminine set and a masculine set, with a cohesive theme. I needed to choose 3 elements from the classes taken during this level 1. It was a hard decision as I have many favourites… But I went with these three:
*Let it shine. It provides wonderful ideas to give that extra special touch to any card, adding shiny elements that take the projects to a higher level.
*Easy die cutting techniques. This class gave me a whole new way of taking advantage of my dies, and it´s very important when mass producing as it really speeds up the process, and also make the cards look more professional.
*Irresistible inking techniques. I enjoyed so much the different ways of incorporating inks other than stamping with it, it gives a lot of more potential to all those gorgeous ink colours.
Creative Process
My mother, who is a PhD in Education, asked me about my creative process when I told her about the challenge. She was very curious to see and compare her creative process as an academic professional with a more relaxed and artistic process, so I thought it could be interesting for some of you to see how I did it.
-Before knowing all the details about the challenge:
· I chose my favourite cards from the 10 classes during level 1.
· I lay them on the table and stated (in my head) why I liked them, for example: the colour combination, the layout, the technique, etc.
-After getting all the details of the challenge:
· I wrote down all the requirements, I did it by hand as it helps me understand the idea better.
· Then I made a list of common elements I wanted my cards to have, based on what I liked the most of my previous cards. I also considered that I needed to make many cards, they had to be special but not too time-consuming.
· Then I made a little table where I put elements that were different to the sets, so I had the feminine on one side and the masculine on the other, so I could visualize the differences between the sets.
· Then I decided to make 6 cards per set. It sounds like a good number for a card set.
· I created a little sketch for each card, I made 6 models, so I would make 2 cards of each design, one for the feminine set and another for the masculine one.
· I had all this info in one piece of paper, and I used it all along, some ideas I used exactly as I wrote them and some I had to be a bit flexible and change.
· This way of working kept me on track at all times, I had my guide to refer to at any point.
Since making 12 cards counts as mass producing I created all elements for all cards step by step: first I made all the backgrounds, then stamped and heat embossed flowers, leaves and sentiments, then painted flowers and leaves, then assembled the cards 2 by 2, using my guide for the designs. This saves a lot of time and makes the elements more cohesive.
Creating the cards
Backgrounds
I created all the backgrounds at once. I cut around 16 pieces of watercolour paper, a bit bigger than A2 size. I sprayed both sides of the paper with water and inked a sleek surface with blue ink, then I picked some colour with a bush and started adding it to the panels.
I changed a bit the way I added the ink, sometimes using an acetate to smoosh the ink, sometimes more ink or more water. I just wanted to create different backgrounds with the same colours.
I let them air dry and placed them under a stack of books overnight to flatten them bit.
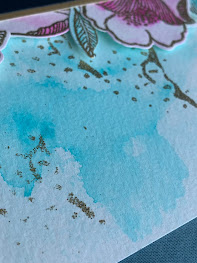
I wanted to add a shiny element to the backgrounds, so I heat embossed a few dots here and there, making it a bit distressed. I didn’t use a powder tool as I didn´t mind the embossing power sticking everywhere.
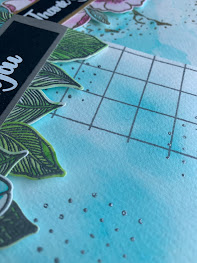
Later I decided to add some geometric element to the masculine set, so I stamped some lines with grey ink, I stamped them horizontally and vertically to create squares in the backgrounds.
Elements
Using my guide, I guessed how many flowers and leaves I would need, just to have an idea.
I chose the set “Adore You” for my images, I love this set and I also have the dies which makes everything easier.
Since I needed many flowers and leaves, I decided to leave the stamps in their original place, I took out all the sentiments. I prepared the surface with and antistatic power bag, inked the stamps with embossing ink and left them flat on the table, then I brought the paper on top of the stamps, rubbed it really well with my fingers but making sure it didn´t shift and lifted it carefully. Then sprinkled some embossing power and heat set it.
I repeated the process a couple of times and then changed colours to make enough elements for both sets. I also made a few more with only leaves for the masculine set.
For the sentiments I used “Painted Butterflies” and “Adore you” stamp sets. I used a stamp positioner this time, I like to stamp it 2 or 3 times to make sure all letters are properly stamped, without squashing them.
I lined all the sentiments so I would get many at once.
I used black cardstock and white embossing powder, always preparing the surface with the antistatic bag, and cleaning up the area with a dry brush to make sure there is no stray powder.
Painting flowers and leaves
I used a similar technique to paint the flowers and leaves as I did for the backgrounds. I wanted a distressed-watercolour look. So I wet the elements using a clean brush, then added a light colour to the whole image going outside of the line, then I picked a darker shade of the same colour and added a few touches here and there and let the ink flow on its own, this technique allowed me to paint everything really fast and I love the organic look it gives. I let everything airdry.
Cutting
I die cut all the flowers and leaves using my die cutting machine and I placed them in mugs, one for the feminine and another for the masculine to keep them organized.
I also cut the sentiment strips and trimmed the backgrounds to an A2 size.
Assembling
After creating my card bases, I distributed the elements and sentiments among the 12 cards, to make sure I had enough of the elements and balanced among the 6 models.
I worked on pairs of cards following my sketches. So, I had models 1 to 6, depending on the design I wanted a darker or lighter background, I wrote the number of the model behind each background to identify them. There are 3 background that needed some die cutting.
This is the general process for each pair of cards.
· Place elements according the model I was working on, move things around and arrange them in a way I like them. Do it for the feminine one and the masculine one.
· Add dimension to elements using fun foam, I use all my scraps.
· Glue all elements. Including the sentiment.
· Work on the next pair.
· When they were ready, I added a couple of sequins to some of the feminine cards.
Model 2
Model 3
Model 4
Model 5
Model 6
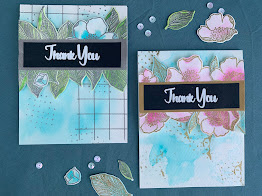
Feminine card set
Masculine card set
Packaging
I used recycled elements to make my boxes. For the cardboard part I used the backing of cardstock packaging, the ones that come in a spiral book. And for the plastic cover I used a box of some make up brushes (for crafting of course!).
I drew a sketch for the bottom part of the box, a rectangle with flaps, cut it out and glue the corners. For the top, the piece was the perfect size, cutting it in half gave me the right size for each box. I decorated this plastic clear cover with some leftovers from the backgrounds. And to attach the top and bottom of the boxes I used a string, so I wouldn’t have to deal with gluing plastic to the cardboard, and it gives a nice touch.
I left the cardboard its natural colour, I think it goes well with the cards.
I hope you like them and that I gave you some ideas, or at least I make you wanna go create something. Have a wonderful day!
Espero que te hayan gustado y que te haya dado algunas ideas, o al menos te haga querer ir a crear algo. ¡Qué tengas día genial!


I Love it!!!!
ReplyDeleteMe encanta todos los diseños, sobre todo la gama de colores.
Creo que la gama de colores fríos combinan genial, me gusto mucho que hicieras un set masculino y femenino, has encajado los elementos de una manera increible!
I love the way you presented the video, I like how you integrate both brains to explain your creative, free and spontaneous process within a structured methodological process.
ReplyDeleteThe result of the techniques and your experience is enjoyed by observing the result of the cards, I love them!
Nice sets! and beautiful cards. I like the masculine ones as usually those cards are ties, or tools which I don´t like for a man card. Thank you for the detailed video.
ReplyDeleteFrom the tiniest detail to the well written post and those sketched out designs, everything looks perfect!! I like how you added more stamping to the masculine cards to make them more manly so to speak :) I think it was a great move! That really does add a bit of character and grunge though keeping the clean lines of the background. I also like that you chose to use more leaves and less florals for the masculine cards, another good move. Good job! I watched the video too, it was great! You did a fantastic job Gabriela and explained everything so well. You will be a great Educator! I would suggest keep making videos!
ReplyDeleteThank you for entering your work to the AECP assignment gallery. Top job.
Awesome sets
ReplyDeleteExcelente!!! Un poema grafico
ReplyDeleteMe encanta, la profundidad la logras con los excelentes tonos de azul
ReplyDelete